Reviews
Published on December 20, 2015
Review of updated Zowie BenQ Lineup

Published on October 12, 2015
Gelid Antarctica Review

Published on August 16, 2015
Zowie GTF-X Review by SnowShovel AVA
Published on August 16, 2015
Zowie G-TFX Review - by Ino

Published on July 31, 2015
ZOWIE ZA12 Review -- by clockwork
Published on July 31, 2015
ZOWIE EC1-A Review -- by truktruk
Published on July 30, 2015
ZOWIE FK2 Review -- by T3NCZAR

Published on July 30, 2015
ZOWIE ZA13 Review -- by gon4alo

Published on July 28, 2015
ZOWIE ZA11 Review -- by fanofangles

Published on July 22, 2015
ZOWIE FK1 Review -- by BaneOfOlympus

Published on July 20, 2015
ZOWIE EC2-A Review -- by irock1288
Published on July 14, 2015
ZOWIE FK2 Review -- by Skins4cheap

Published on July 14, 2015
ZOWIE EC1-A Review -- by iBurley

Published on July 8, 2015
TF2 player WARHURYEAH reviews ZOWIE ZA12
Zowie G-SR Review - by Ino
Zowie ZA Review
This is my review of the Zowie ZA11, ZA12 and ZA13.
Mousepad is Zowie G-SR which I will review in a seperate video shortly.
Zowie ZA Series review
Jimmy Whisenhunt, a competitive gaming veteran that now works in game development, had the chance to try the new ZA series early. This is his video introducing the new mouse as well as highlighting the differences between the ZA and the FK series.
The new Zowie FK1! Have any questions write a comment!
Zowie FK1 Review/Thoughts
My Review of the Zowie G-SR Mousepad
Zowie G-SR Mousepad Review

Unfortunately I could not get any programs to read my GPU temps, but I have CPU temps. Here are my results:
Note: Gaming results were collected while playing GTA 5 on high graphics settings with v-sync for about an hour.
Stock Thermal Compound
Idling: ~130F (Average) 135F (Max)
Gaming: ~190F (Average) 205F (Max)
Gelid Solutions GC-Extreme
Idling: ~120F (Average) 125F (Max)
Gaming: ~175F (Average) 185 (Max)
That's a 10F difference while idling and 15F-25F difference while gaming. So of course this kept my processor from throttling itself down. So, I'd say this was money well-spent.
Added bonus: it was really easy to apply.

Things to note for installation.
When you remove the stock cooler you must use a cleaning agent on the ram chips BEFORE you attempt to attach the heatsink tape. If you do not clean them very well with something like ArctiClean the tape will not adhere very well and the heatsinks can and will fall off.
The supplied TIM (thermal interface compound) that is supplied is OK but if you have a brand that you trust (for me it's Shin-Etsu) then by all means use that. I advise that you do a test application of TIM on the GPU and mount the cooler on it then pull it back off to see if the amount you applied gives adequate coverage. The last thing you want is for the GPU to have a bare spot from to little TIM being applied. This creates hot spots and could potentially damage the GPU.
Set aside a good hour to perform the installation as there are a lot of screws, double sided tape, and heatsinks to install. Be sure to read the instructions and take your time and test fit everything before you go installing it all.
Pros: amazing cooling performance compared to stock and simple installation for an aftermarket gpu cooler.
Cons: Non PWM fans and fans do make a little bit of a hum. You need to buy the supplement kit for full compatibility.
Bottom line this is a must have upgrade for anyone with a 290 or 290X with a stock cooler. The night and day difference it makes is amazing. No more heat related gpu throttling, and best of all it's all but silent now, no louder than a well built water cooling solution.

- very competent cooler
- not taller than the card
- quiet fans at low settings
- reasonable street price could be found
Cons:
- while the heatsink looks well made, the included parts feel average, the screws breaks easily (see below)
- fans gets noisy at full setting (not sure about the claimed max 26dba)
- instructions could be better (but you shouldn't need it in the first place.)
- non pwm fans (ends up being a pro on my crappy HIS card which doesn't have pwm connector for the fan)
- sticks out the back of the card making it longer depending on where the actual GPU is on the board.
- makes your GPU card a 3 slot card instead of 2.
*GENERAL*
The fan on my crappy HIS HD6850 card became a jet engine after about three weeks. Since the stock cooler performed really bad anyways, I decided to mod it. After wasting a lot of time modding it and putting a super powerful fan on it, the temperature is still way higher than I like, so I decided to get an after market cooler.
After much research I narrowed my choices of after market GPU coolers to Arctic Accelero TWIN TURBO Pro, Zalman VF3000A, and this.
Base on reading a lot of reviews, all three are very competent coolers and performances are very comparable, even though the VF3000A may have a negligible edge ahead.
I have Arctic case fans and I like those, plus the Accelero seems the cheapest of the three, so it was my first choice, but too bad its protruding heat pipes made the heatsink too tall for my HTPC case, so it's out.
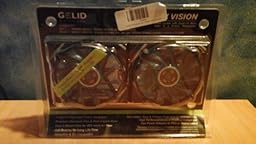
Zalman has established itself with a good reputation and VF3000A generally gets praises for its quality and performances, so that's my next choice. Its height also meets my need. Had I found a good street price, this would've been my cooler. And then I saw some complains about its fans and also it doesn't have as many ram heatsinks, so I started looking into GELID icy vision.
Ultimately I found the things that matter to me icy vision meets my needs so I bought it since I found a good deal on it. It seems a lot of the complains is that its instruction is lacking and difficult to install, which I was quite skeptical. How difficult could it be to install a heatsink? Either it fits or it doesn't, end of story.
*INSTALLING*
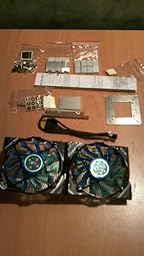
After I got it, first impression it generally exceeds my expectation: good size and definitely will fit my HTPC case. Fans looks good. The contact plate is shinny and flat. Lots of parts and nicely separated and packaged into small zip loc bags. Instructions are actually better than I expected. Each part is clearly pictured and described. The installation steps for both nvidia and ati cards are listed.
Of course as other reviews noted, the fans are not pwm, but the cables are nicely sleeved. Of course not pwm ends up being a good thing for me because my card is too cheap to come with pwm connector and instead control the fan with voltage instead.
Since this will fit both nvidia and ati cards you will find a bunch of parts (screws & heatsinks) that may not be applicable to you depending on which card you have. Without the instructions it might take a bit a fiddling to figure out, but should be easy enough, of course with instructions it's just a matter of looking it up.
After figuring out the parts needed it's just a matter of lining up and applying thermo paste and securing it on the card. The whole process was smooth with almost no major incident. A small problem was when I was securing the nut on the screw while attaching it on the heatsink, I applied a little too much force with the screw driver, and I promptly twisted the screw into two pieces. *** So definitely becarefuly not to use too much force when tightening the nuts on the screws. *** Luckily there are extras so I was able to finish installing it.
Installing the ram/vrm heatsinks was quite straightfoward. It was too obvious which one goes where so I am not sure about some of the complains about that. The sticky pad was a bit tricky to peel, but using something with a sharp point (like a toothpick) I was able to go through them in a breeze. The heatsinks feel quite secured on the ram chips.
To make sure the heatsink is making good contact with the GPU, I applied thermo paste and press the heatsink on and then took it off to make sure the paste ends up on the heatsink. After that I reapplied the paste and fully installed the heatsink and secured the screws with the nuts. The whole installation took about 30 minutes.
Since the GPU chip is at the center of the board, I got a good part of the heatsink sticking out the back of the card so now it's effectively longer, luckily still fits my case. Of course now it also blocks 1 of my SATA ports, which I don't use though. So if you have a tight space make sure you check.
*PERFORMANCE*
Even though I was expecting it, I was still amazed the level of temperatures I could get. With fans running 50%, compare to the stock cooler, on idle, my temperature dropped about 8C, but on load with OCCT, it dropped a good solid ~25C. Finally I am happy that right now in winter, my GPU temp hovers above 50 C instead of above 70C, so I am ready for summer. If I run the fans at 100% I could get another 5C drop so I get right at about 50C under load. Compare to the stock cooler, running the fans at lowest my temp still get about 18C drop under heavy load.
The fans are very quiet at low setting (nearly silent unless I stick my ears about 1 feet away). However, at 50% to 100%, they start to make high pitch whinning sound. Compare to a 24dba 92mm Arctic fan I have, they are much louder, so I am not sure about their claim of max 26dba.
Overall I am very happy with this cooler. Everything that matters it exceeded my expectations. Also, looks like it will be fairly easy to mod it and put some different fans on it, but the fans it came with are quite good already so no need for that.
Legal Notice: By entering information into Rexflo's forum, website, review application, YOU hereby agree to ASSUME all risks including, but not limited to, the risk of fraud, duplicity or any other types of harm as a result of your engagement, directly or indirectly, with any other person within the forum. Rexflo do not endorse nor support any advertisement or activities posted by any person to Rexflo forum. YOU agree to exercise reasonable caution and judgment when solicited to purchase, donate, attend social functions or simply when communicating with strangers. YOU agree to not solicit, advertise or engage in any illegal services or activities, discriminate against any other person based on sex, race, religion, political affiliation or on any other basis prohibited by state or federal law. Advertisers of services, products, or events: YOU hereby agree to assume all liabilities associated with postings made by YOU and to hold harmless and indemnify Rexflo for any legal fees in connection therewith. Any person suspected of engaging in any illegal activities or service shall be removed by administrator. YOU hereby agree to report any suspicious person to administrator and said individual's information shall be furnished to local, state or federal authorities for investigation and prosecution.
@2015 Rexflo. All rights herein reserved to the fullest extent of the law.